
By the time you finish this guide, you’ll have a neat Uptime Monitor tool on your hands that checks whether a website is up or down and gives you a full report on its status. In this digital age, making sure your website is always accessible is key to keeping your customers satisfied and making sure they can always reach you. Think of it like using a service like “Is It Down Right Now?”—but instead, you’ll be building your own simple tool to monitor any website’s uptime. This guide will walk you through setting up a basic website monitoring tool using Flask, which is a straightforward and powerful Python web framework.
What You Will Learn
- Setting up a Flask environment.
- Creating a simple web application to check website status.
- Interpreting HTTP responses.
- Running and testing your application locally.
Prerequisites
Before we start, you’ll need:
- Basic knowledge of Python programming.
- Python installed on your computer (Python 3.6 or newer recommended).
- Flask installed, here is our full guide if you have missed it.
Step 1: Setting Up Your Python Environment
Install Flask
Flask can be installed via pipx, Python’s package installer. Open your terminal or command prompt and run the following command:
pipx install requests --include-depsThis command installs Flask along with the requests library, which is crucial for making HTTP requests to check website statuses.
Create a Project Directory
Organize your project by creating a new directory and navigate into it:
mkdir website_status_checker
cd website_status_checker
Step 2: Writing Your Flask Application
Create a new file called app.py in your directory. This file will contain all the code for your application.
touch app.pyOpen app.py in your code editor and start by importing the necessary modules:
from flask import Flask, request, jsonify, render_template_string
app = Flask(__name__)
@app.route('/', methods=['GET'])
def index():
# HTML form to input the URL
form_html = '''
<html>
<body>
<h1>Website Uptime Checker</h1>
<form action="/check" method="post">
Enter URL to check: <input type="text" name="url"><br>
<input type="submit" value="Check Status">
</form>
</body>
</html>
'''
return render_template_string(form_html)
@app.route('/check', methods=['POST'])
def check_website():
url = request.form['url']
try:
response = requests.get(url, timeout=10)
if response.status_code == 200:
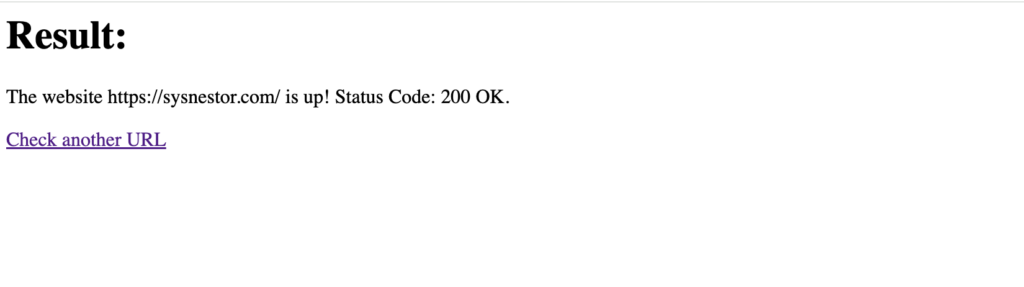
result = f'The website {url} is up! Status Code: 200 OK.'
else:
result = f'The website {url} is down! Status Code: {response.status_code} {response.reason}.'
except requests.exceptions.RequestException as e:
result = f'Failed to reach the website {url}. Error: {str(e)}'
return f'<html><body><h1>Result:</h1><p>{result}</p><a href="/">Check another URL</a></body></html>'
if __name__ == '__main__':
app.run(host='0.0.0.0', debug=True)- HTML Form: The root route (
'/') now returns an HTML form where users can enter the URL they want to check. - Form Submission: The form submits a POST request to
/checkwith the URL as form data. - Result Display: After processing the request to check the URL, the application displays the result and provides a link to go back and check another URL.
Step 3: Running the Application
To make your application accessible on your network via the server’s IP address, ensure you run the Flask app with host='0.0.0.0'. This tells your operating system to listen on all public IPs.
FLASK_APP=app.py FLASK_DEBUG=1 flask run --host=0.0.0.0Step 4: Accessing the Application
Now, from any web browser on the same network, you can access your Flask app by navigating to:
http://<server-ip>:5000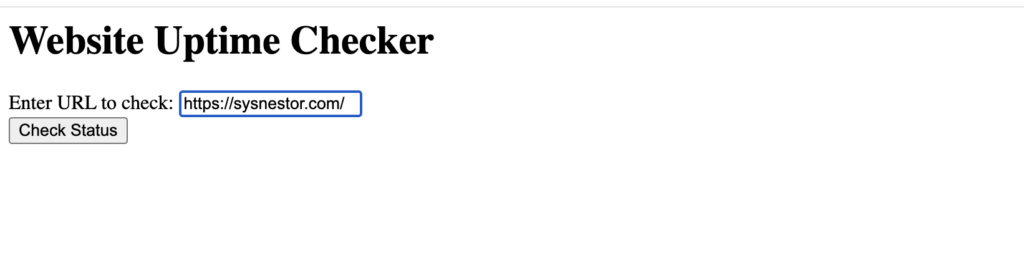
This setup allows any visitor to your Flask application to enter a website URL and check its status directly through their browser. It’s a practical way to make your website uptime checker user-friendly and accessible without any advanced configuration from the user’s side. This approach is ideal for educational purposes, internal tools, or even a public utility service, depending on your needs and scaling considerations.