Having a multilingual website is now essential in the current globalized digital environment. It increases user experience, increases your audience reach, and even improves your SEO rankings. Being the adaptable platform that it is, WordPress provides a plethora of plugins to assist you in building a multilingual website. WPML (WordPress Multilingual Plugin) is one such effective plugin. This tutorial will show you how to use WPML to translate your WordPress website into multiple languages.
Knowing the Value of a Multilingual Website
Let’s take a moment to understand the importance of a multilingual website before getting into the how-to. Your website can reach users from various countries who speak different languages thanks to the internet’s ability to erase geographic boundaries. Language barriers are removed when your website is available in multiple languages, increasing the accessibility of your content. The traffic and conversion rates to your website may significantly increase as a result. Furthermore, it improves user experience and demonstrates respect for cultural diversity.
WPML Plugin is a good option for multilingual websites
WordPress does not come with built-in support for multilingual functionality, but plugins make it simple to implement. Among these plugins, WPML stands out thanks to its cutting-edge translation management features. You can translate texts for pages, posts, custom types, taxonomies, menus, and even the texts of the theme. Although WPML is a premium plugin, the cost is justified by its extensive features.

Installing WPML on Your WordPress Site
To install WPML, you first need to purchase it from the WPML website. Once you have downloaded the .zip file, follow these steps:
- In your WordPress dashboard, navigate to ‘Plugins’ > ‘Add New’ > ‘Upload Plugin’.
- Choose the WPML .zip file you downloaded and click ‘Install Now’.
- After the plugin is installed, click ‘Activate Plugin’.
- You will now see a new WPML section in your WordPress dashboard.
Configuring WPML
After successfully installing WPML, the next step is to configure it. Here’s how you can do it:
- Go to the WPML section in your dashboard and click on ‘Languages’.
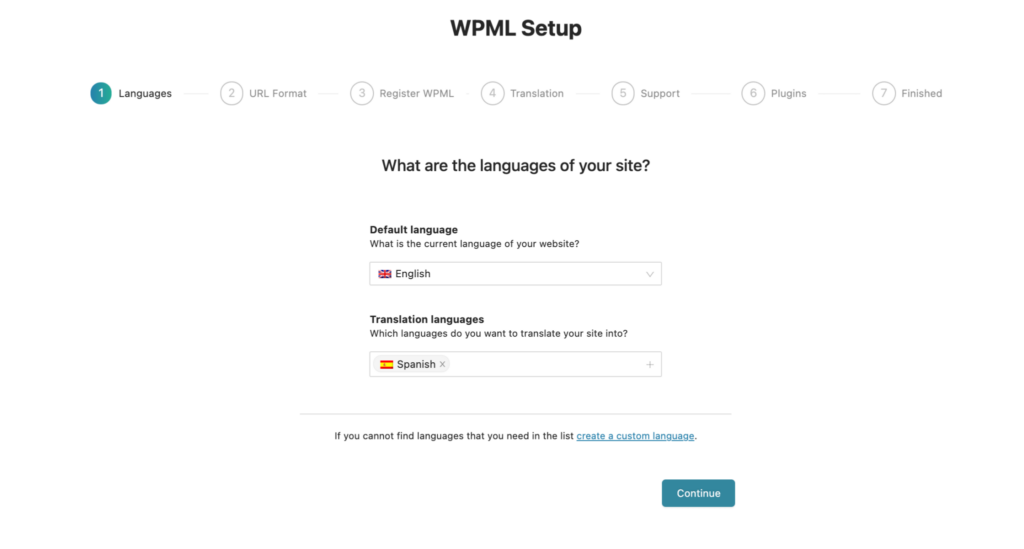
- Choose the current language of your site and the languages you want to add. WPML supports over 40 languages, and you can also add your own language variants.
- Next, configure the language switcher. This is a widget that allows users to switch between languages. You can decide where to display it (header, footer, menu, or as a widget) and how it should look.
Translating the Content
With WPML set up, you can now start translating your content. WPML allows you to translate your content manually or use translation services.
- For manual translation, go to ‘Pages’ or ‘Posts’ and choose the content you want to translate.
- Click on the ‘+’ icon next to the language you want to translate to.
- Translate the content and click ‘Publish’ or ‘Update’.
- Repeat the process for all the content you want to translate.
For automatic translations, WPML also provides an Advanced Translation Editor. Machine translations might not always be accurate, so it’s a good idea to double-check them.
Translating the Theme and Plugins
WPML also allows you to translate the texts of your theme and other plugins.
- Go to ‘WPML’ > ‘Theme and plugins localization’.
- Choose the theme or plugin you want to translate and scan it for strings.
- After scanning, you can translate the strings manually.
Summary
WordPress multilingual site creation may seem like a difficult task, but with the right tools, such as WPML, it becomes simple. By making your website multilingual, you not only increase the accessibility of your content to a wider audience but also enhance user experience and SEO. Just be sure to pick the appropriate multilingual plugin, configure it correctly, and check that the translations are precise.