

Navigating the intricacies of managing a website can sometimes seem daunting, particularly when it involves tasks like transferring files and accessing servers. For those who use cPanel as their website management tool, mastering the art of efficiently handling FTP (File Transfer Protocol) accounts becomes a vital skill. This detailed guide aims to demystify the process of creating a new FTP account within cPanel for a specific domain. By following these steps, you’ll gain the expertise and assurance needed to perform this task effortlessly, ensuring smooth file management and enhanced control over your website’s backend operations.
The FTP Account and Its Importance
FTP, or File Transfer Protocol, is a fundamental network protocol employed in the transfer of files between a client (such as your computer) and a server (like your web hosting server) over the internet. This protocol plays a pivotal role in various aspects of website management. It’s essential for uploading new files or updating existing ones on your website, which is critical for website development and maintenance. Additionally, FTP is invaluable for managing site content, especially for large files or numerous uploads, as it can be more efficient than web-based interfaces. Moreover, it’s a handy tool for backing up your website data, providing a secure and reliable way of ensuring that your site’s content is safeguarded against data loss. Understanding FTP and how to manage FTP accounts in cPanel is, therefore, crucial for anyone involved in website administration and maintenance.
Adding an FTP Account:
Before starting the process of creating an account in cPanel for your specific domain, you need to make sure you have a couple of key elements ready:
- Access to cPanel: Ensure that you have login credentials to access the cPanel of your hosting account. cPanel is a web-based hosting control panel provided by many hosting providers that simplifies website and server management. You will need your username and password to log in.
- Domain Name: Have the domain name for which you wish to create the account at hand. This is important because accounts are often set up to give access to specific areas of your hosting environment, often tied to particular domains hosted within your account.
Having these two pieces of information ready will streamline the process, allowing you to efficiently create an FTP account specific to your needs.
Accessing FTP Accounts in cPanel:
Once you’ve logged into cPanel with your credentials, the next step is to locate the ‘FTP Accounts’ option. Here’s how you do it:
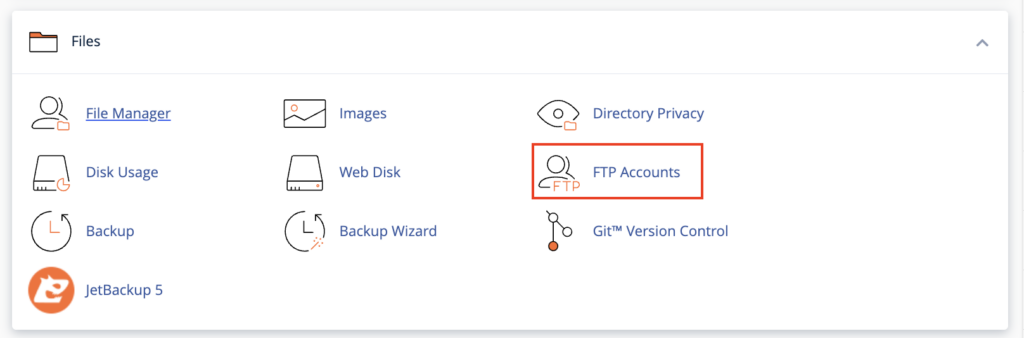
- Navigate to the ‘Files’ Section: After logging into cPanel, you will find yourself on the dashboard that presents various options and sections. Look for the section titled ‘Files’. This section is dedicated to managing all aspects related to your website’s files and backups.
- Click on ‘FTP Accounts’: Within the ‘Files’ section, you will find an option labeled ‘FTP Accounts’. This is the gateway to managing all FTP-related tasks within your cPanel. Clicking on this option will take you to a new page where you can create and manage FTP accounts.
By following these steps, you’re now ready to proceed with setting up a new FTP account for your domain.
Setting Account Details
ChatGPT
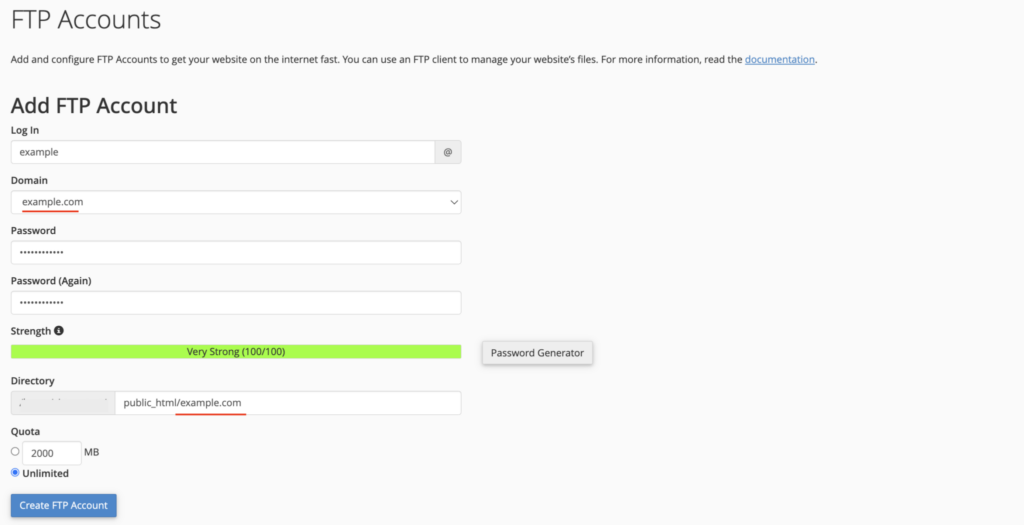
In the ‘FTP Accounts’ section of cPanel, you’ll find the area where you can add a new FTP account. This is typically presented in the form of an ‘Add FTP Account’ form, where you’ll need to enter various details to set up the new FTP account. Here’s a brief overview of the information you’ll be required to input:
- Log In: This is where you specify the username for the new FTP account. This username will be used to log into the FTP server.
- Domain: From a dropdown menu, select the domain for which you’re creating this FTP account. This is particularly important if you have multiple domains hosted on the same hosting account.
- Password: Choose a strong, secure password for the FTP account. Some cPanel interfaces may offer a password generator for creating a robust password.
- Password (Again): Re-enter the password for confirmation.
- Directory: This field specifies the folder that the FTP account will have access to. By default, cPanel may fill this field based on the FTP username, creating a directory within the
public_htmlfolder. You can modify this if you want the FTP account to access a different directory. - Quota: Set the maximum amount of disk space the FTP account can use. You can choose ‘Unlimited’ or specify a certain amount of disk space in MB.
After filling out these details, you’ll typically find a ‘Create FTP Account’ button at the bottom of the form. Clicking this will finalize the creation of the new FTP account with the specified settings.
Finalizing the Account Creation
Once you have filled in all the necessary details in the ‘Add FTP Account’ form on cPanel, the final step is to create the account. Here’s what you do:
- Review the Details: Before proceeding, it’s a good idea to double-check the information you’ve entered, such as the username, password, and directory access. This ensures that the FTP account is set up exactly as you need it.
- Click ‘Create FTP Account’: You’ll find a button labeled ‘Create FTP Account’ at the bottom of the form. Clicking this button will initiate the creation of the new FTP account based on the details you’ve provided.
- Confirmation and Listing: After clicking the button, cPanel will process the creation of the FTP account. Once completed, you should see a confirmation message. The new FTP account will now be listed in the ‘FTP Accounts’ section. This list provides an overview of all existing FTP accounts, including the one you’ve just created, along with options to manage these accounts (such as changing passwords, changing quotas, or deleting accounts).
With these steps, you have successfully created a new FTP account for your domain in cPanel. This account can now be used to manage files on your server via an FTP client.

Summary
Setting up an FTP account in cPanel for your domain is indeed a straightforward process, and it plays a crucial role in efficient and secure website management. Here’s a recap of the key points:
- Ease of Process: As outlined in the steps above, creating an FTP account in cPanel involves a few simple steps – logging into cPanel, navigating to the ‘FTP Accounts’ section, filling in the required details in the ‘Add FTP Account’ form, and finally creating the account.
- Efficient File Management: FTP accounts enable you to manage your website’s files more effectively. Whether it’s uploading new content, updating existing files, or performing backups, FTP provides a robust platform for these tasks.
- Security Considerations: It’s important to remember that FTP accounts grant direct access to your website’s files. Therefore, it’s essential to use strong, unique passwords for each FTP account and to manage access permissions carefully. Be judicious about who you provide FTP access to and monitor the usage of these accounts.
- Responsibility in Management: Handling FTP accounts requires a sense of responsibility. Regularly updating passwords, monitoring account activity, and restricting access to necessary files and directories are best practices to keep your site secure.
By understanding and utilizing FTP accounts, you can greatly enhance the way you manage your website, ensuring both efficiency and security in handling your site’s files and content.