A WordPress database is a fundamental component of any WordPress site, serving as the primary storage location for all the data associated with the site. It plays a crucial role in how WordPress functions and manages content. WordPress stands as a beacon of versatility in the world of Content Management Systems (CMS), illuminating the path for a substantial number of websites around the globe. Renowned for its user-friendliness and solid reliability, WordPress has become a go-to choice for a plethora of website owners and creators. Yet, there comes a moment in the life of a WordPress site where expansion or maintenance beckons, necessitating the introduction of a developer into the fold. At this crucial juncture, the process of providing remote access to your site’s inner workings becomes paramount.
A cornerstone of this process involves the creation of a new database user, a task that demands both precision and caution. This step is more than a mere technicality; it’s a strategic move that ensures your website’s backbone – the database – remains robust and secure. Granting the right level of permissions to this new user is a delicate balance, one that requires a nuanced understanding of both your site’s needs and the capabilities you wish to enable for your developer.
This guide is meticulously crafted to escort you through every step of this pivotal task. It’s not just a set of instructions; it’s a pathway to enhancing your WordPress site’s functionality while fortifying its security. We will delve into the nuances of creating a new database user, focusing on the ‘how’ as much as the ‘why’. You will learn to navigate this process with the skill of a seasoned webmaster, ensuring your site’s efficiency and integrity remain uncompromised. Let this guide be your compass in the ever-evolving landscape of WordPress management, leading you to a destination where security and efficiency coexist in harmony.
The Need for a New WordPress Database User
Creating a new WordPress database user for developers working on your WordPress site is a strategic decision that significantly enhances security, ensures accountability, streamlines access management, allows for customized permissions, and mitigates risks. These practices are integral to maintaining a secure, efficient, and well-managed website.
Understanding the necessity of creating a new database user, especially when working with a developer on your WordPress site, is pivotal for several key reasons:
- Enhanced Security: The paramount reason for creating a distinct WordPress database user for your developer lies in the realm of security. By assigning a unique user, you’re able to meticulously control and restrict their access to only those areas of the WordPress database they need to work on. This approach adheres to the principle of least privilege, which is a best practice in any secure system, ensuring that each user has the minimum level of access required to perform their job. In the event of a security breach, this limitation can significantly minimize potential damage.
- Clear Accountability: When multiple users are working on a website, it becomes challenging to track who made specific changes, especially if they are all using a shared account. A dedicated WordPress database user account for your developer creates a clear trail of accountability. Any modifications, updates, or issues can be directly traced back to the individual user, facilitating easier tracking and auditing of changes. This transparency is crucial for maintaining the integrity of your website and for troubleshooting purposes.
- Simplified Access Management: The lifecycle of a website often involves different developers or teams working on it at various stages. By assigning individual WordPress database users, you gain the flexibility to manage access efficiently. When a developer’s role on your project concludes, you can simply revoke their database access without affecting other users or needing to change shared login credentials. This method is not only secure but also ensures a smooth transition and continuity in the management of your site.
- Custom Permission Levels: Different developers may need different levels of access depending on the nature of their work. With individual WordPress database user accounts, you can customize the permissions for each user. For instance, one developer might require read-only access, while another might need full access for a particular project. This tailored approach to permissions helps maintain a secure and organized environment.
- Risk Mitigation: In the event a developer’s credentials are compromised, having a unique WordPress database user limits the risk to only the areas of the site that the user had access to. This compartmentalization of access rights is a crucial aspect of risk management in database administration.
Creating a New WordPress Database User
To begin the process of creating a new WordPress database user for your WordPress site, the first step is to access your web hosting control panel. This is where you’ll find the necessary tools and settings to manage your website’s database. Here’s how you can do this:
Logging into Your Web Hosting Account
- Open your web browser and go to your web hosting provider’s website.
- Locate the login or account access section on the website. This is typically found at the top corner of the homepage.
- Enter your username and password. These are the credentials you set up when you first registered for hosting services. If you’ve forgotten your password, use the ‘Reset Password’ link to reset it.

Opening the MySQL Databases Section
Continuing from accessing your hosting control panel, the next step in managing your WordPress database is to locate and open the MySQL Databases section. Here’s how you can do it:
- Locate the MySQL Databases Icon:
- Within your control panel (commonly cPanel, as in many hosting services), you need to find the MySQL Databases option. This is typically located under a section labeled ‘Databases’.
- The control panel’s layout may vary depending on your hosting provider, but generally, the database section is easily identifiable. Look for icons or links specifically mentioning ‘MySQL’ or ‘Databases’.
- Click on the MySQL Databases Icon:
- Once you locate the MySQL Databases icon, click on it. This will take you to a new page or section within the control panel where you can manage all aspects of your MySQL databases.
- In the MySQL Databases section, you’ll find options to create new databases, add new users, manage existing databases and users, and set user permissions.

This step is crucial as it leads you to the area where you can begin the process of creating a new WordPress database user for your WordPress site. MySQL is the database management system used by WordPress, and through this section of your control panel, you’ll be able to perform all the necessary database management tasks for your website.
Remember, if you are unfamiliar with WordPress database management, proceed with caution and consider consulting documentation or seeking assistance. Making changes to your WordPress database settings can significantly impact your website’s functionality, so it’s essential to understand each action you perform.
Creating a New WordPress Database User
Creating a new database user is a critical step in managing your WordPress site’s database, especially when you need to grant access to a developer or manage various aspects of your website. Here’s how you can create a new database user from the MySQL Databases page in your hosting control panel:
- Navigate to the MySQL Users Section:
- On the MySQL Databases page within your control panel, scroll down until you find the section labeled ‘MySQL Users’. This section is dedicated to user management for your MySQL databases.
- This area is specifically for creating and managing the users who can access and interact with your MySQL databases.
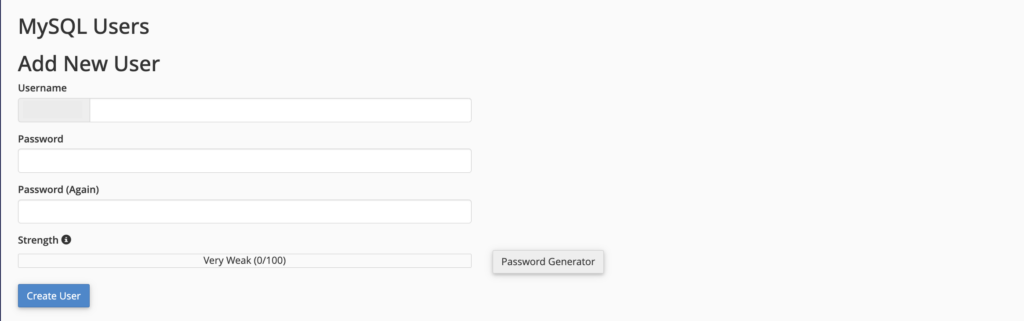
- Enter the New User’s Details:
- In the MySQL Users section, you will find fields to enter a new username and password.
- Username: Choose a username for the new database user. Some hosting providers automatically prefix your username with a part of your hosting account name for uniqueness.
- Password: Enter a strong password for the new user. It’s crucial to use a strong, secure password to protect your database. Often, there will be a password generator tool available that you can use to create a secure password.
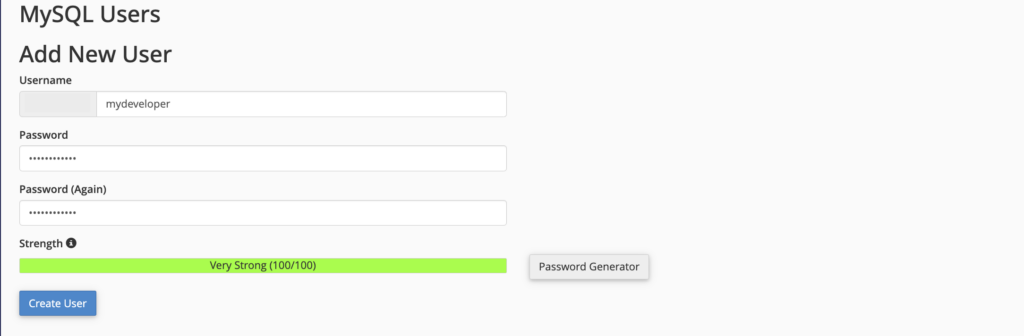
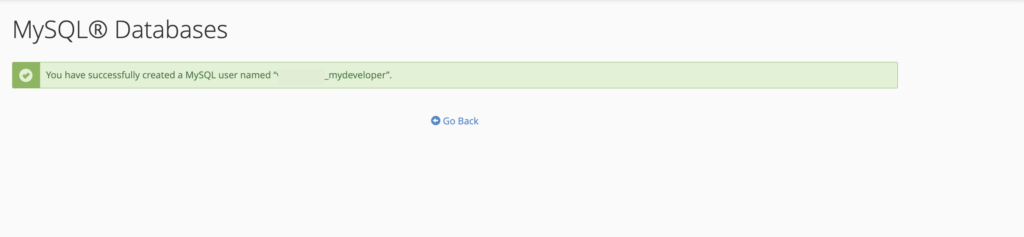
- Create the User:
- After filling in the username and password fields, look for the ‘Create User’ button.
- Click this button to create the new database user. Upon clicking, the system will process your request and add the new user to your MySQL database users list.
- Confirmation and Further Actions:
- Once the user is created, you should receive a confirmation message indicating that the process was successful.
- After creating the new user, remember that you’ll also need to assign this user to a database and grant them appropriate permissions. This step is crucial as it defines what the user can and cannot do within the database.
Creating a new database user is just the beginning. The subsequent steps of assigning the user to a database and setting their permissions are equally important to ensure that your website operates securely and efficiently. Always be cautious with database settings, and if you’re unsure about any step, it’s wise to consult with your hosting provider or a professional for guidance.
Adding User to the Database
After creating a new database user, the next important step is to add this user to the relevant database. This action will grant the user access to the database associated with your WordPress site, allowing them to perform tasks as per the permissions you set. Here’s how to do it:
- Find the ‘Add User to Database’ Section:
- On the same MySQL Databases page where you created the new user, look for a section titled ‘Add User to Database’. This section is typically located below the area where you created the new user.
- This part of the control panel interface is designed specifically for linking users to databases.

- Select the User and Database:
- In the ‘Add User to Database’ section, you will find two dropdown menus. One is for selecting the user, and the other is for selecting the database.
- From the first dropdown menu, select the user you just created.
- From the second dropdown menu, select the database you want this user to access. This should be the database associated with your WordPress site.

- Add the User to the Database:
- After selecting the appropriate user and database, look for the ‘Add’ button – it might also be labeled ‘Add User to Database’.
- Click this button to proceed. The system will then process your request and link the selected user to the chosen database.
- Confirmation and Setting Permissions:
- Once you’ve added the user to the database, you should receive a confirmation message indicating that the process was successful.
- The next crucial step is to set permissions for this user, which defines what actions the user can perform in the database. This is typically done through a subsequent screen where you can select the specific privileges you want to grant to the user.
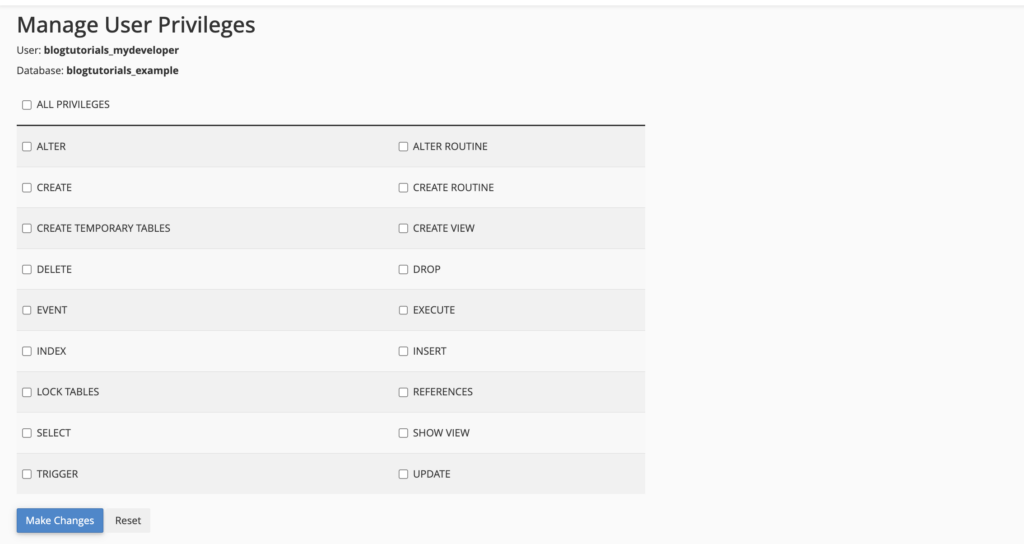
Remember, assigning the right permissions is key to maintaining the security and integrity of your site. Always be mindful of the level of access you grant and modify these settings as necessary based on the user’s role and responsibilities. If you’re unsure about any of these steps or the permissions to grant, seeking advice from a knowledgeable source is recommended.
Granting Remote Access to Your Developer
Remote MySQL is a feature that allows external servers or hosts to connect to your MySQL database. By default, MySQL databases hosted on a server are configured to accept connections only from applications running on the same server for security reasons. Remote MySQL, when enabled, broadens this scope by permitting connections from specified external sources.
Understanding Remote MySQL
Understanding Remote MySQL is crucial when managing a WordPress site, especially if you are working with remote developers or need to allow external services to interact with your database. Here’s an overview of what Remote MySQL is and why it’s important:
- Why is it Necessary for Remote Developers?
- For remote developers to directly access and work on your WordPress database, they need the ability to connect to your database from their own workstations or servers. This is where Remote MySQL comes into play.
- By adding the IP addresses or hostnames of the remote developers’ machines to your Remote MySQL settings, you grant them the necessary access to connect to, modify, and manage the database from a remote location.
- Security Implications
- Enabling Remote MySQL access should be done with careful consideration of security. Exposing your database to external connections increases its vulnerability to unauthorized access or attacks.
- It’s essential to only allow trusted IP addresses or hostnames. Some setups allow for wildcard usage (like
%), but this can be risky as it opens the database to a wide range of IPs. It’s safer to specify exact IP addresses or a narrow IP range.
Adding Host in Remote MySQL
Adding a host in Remote MySQL is a critical step when you need to grant remote developers or external services access to your WordPress database. Here’s how you can do this through your hosting control panel:
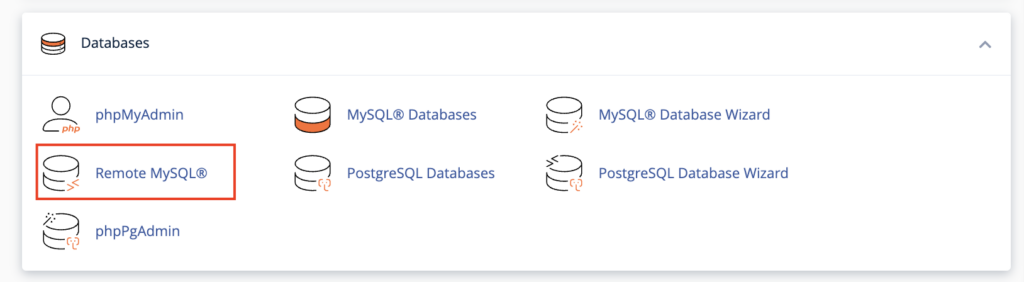
- Locating and Opening Remote MySQL:
- First, log into your hosting control panel, the same place where you accessed the MySQL Databases.
- Look for a section or icon named ‘Remote MySQL’, ‘MySQL Remote Access’, or something similar. This option is typically located in the databases section of the control panel.
- Click on this to open the Remote MySQL settings page.
- Entering the Developer’s IP Address or Hostname:
- On the Remote MySQL page, you’ll find a section labeled ‘Add Access Host’ or ‘Add Host’. This is where you’ll enter the information to allow external access.
- Input the IP address or hostname of the developer’s computer or the external server that needs access. This must be the exact IP address or a correctly formatted hostname.
- If you’re unsure of the developer’s IP address, ask them to provide it. Keep in mind that some internet service providers use dynamic IP addresses, which can change; in such cases, you might need to update this setting periodically.
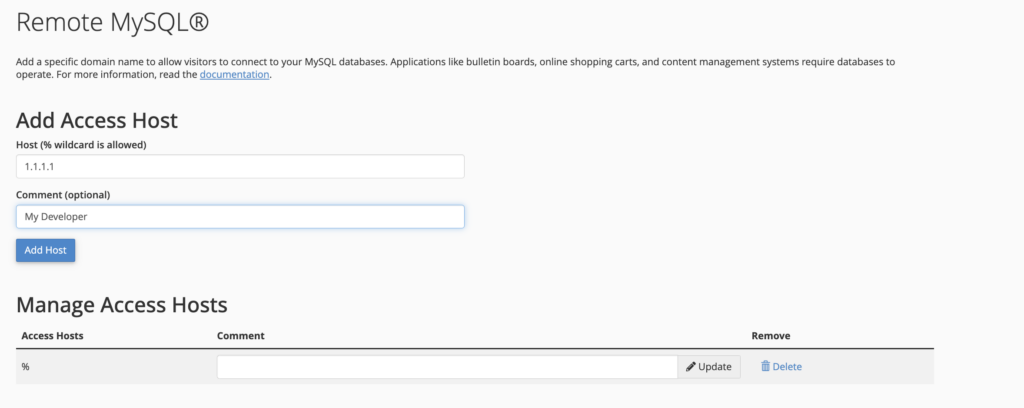
- Adding the Host:
- After entering the IP address or hostname, look for a button labeled ‘Add Host’, ‘Add’, or something similar.
- Click this button to save the new setting. This action will grant access to the specified IP address or hostname, allowing connections to your MySQL database from that remote location.
- Confirmation and Security Considerations:
- Once you add the host, you should receive a confirmation message indicating that the process was successful.
- It’s crucial to regularly review and manage the list of allowed hosts in your Remote MySQL settings to ensure that only authorized and current users have access. Remove any old or unknown entries to maintain security.

By adding a host in Remote MySQL, you enable specific external connections to your database, which is essential for remote development work. However, this also highlights the importance of strict security practices. Always ensure that only trusted and necessary IP addresses or hostnames are allowed, and monitor these settings regularly for any unauthorized changes. If you’re uncertain about any aspect of this process, it’s advisable to seek assistance from your hosting provider or a professional.
Connect To MySQL Remotely
HeidiSQL is a popular, lightweight, and user-friendly tool for managing MySQL, MariaDB, Microsoft SQL Server, PostgreSQL, and SQLite databases. It’s particularly favored for its simplicity and effectiveness in handling database management tasks. Here’s an overview of HeidiSQL and how you can use it to connect to a database:
- Overview of HeidiSQL:
- Free and Open Source: HeidiSQL is free to use and open-source, making it accessible for everyone from hobbyists to professional developers.
- Intuitive Interface: It offers an intuitive graphical user interface (GUI) that simplifies database management, including creating and editing databases, tables, views, stored procedures, and more.
- Data Export and Import: HeidiSQL allows you to export and import data in various formats, such as CSV, HTML, XML, and SQL.
- Query Editor: It comes with a powerful SQL editor for writing, testing, and optimizing SQL queries.
- Server and Database Management: Users can manage multiple servers and databases, view and kill client processes, and check server variables and logs.
- Connecting to a Database with HeidiSQL:
- Installation: First, download and install HeidiSQL from its official website. It’s available for Windows and can also be run on other operating systems using Wine.
- Launching and Setting Up a New Connection: After installing, open HeidiSQL. The ‘Session Manager’ will appear, where you can set up new connections to databases.
- Creating a New Session:
- Click on the ‘New’ button to create a new session.
- Give your session a meaningful name for easy identification.
- Select the ‘Network Type’ based on your database server (e.g., MySQL (TCP/IP), Microsoft SQL Server (TCP/IP), PostgreSQL (TCP/IP), etc.).
- Enter the ‘Hostname / IP’, ‘User’, and ‘Password’. The hostname could be a local or remote server address.
- Specify the ‘Port’ if it’s different from the default one used by the database server.
- Optionally, select the database you want to connect to directly. This can be left blank to choose from available databases after connection.
- Connecting to the Server:
- Click ‘Open’ to establish the connection.
- If the connection is successful, you’ll see the database(s) listed in the left-hand pane.
- You can now browse tables, execute SQL queries, and manage the database as needed.
- Security Considerations:
- When connecting to a remote database, ensure that your connection is secure. Use SSH tunneling or VPNs if connecting over the internet.
- Always ensure the database user has appropriate permissions and avoid using root or admin accounts unless absolutely necessary.
Comments (1)