

So, you’ve decided to dive into the world of relational databases, and PostgreSQL seems like the perfect choice. In this tutorial, we’ll walk you through the step-by-step process of installing PostgreSQL on Ubuntu 23. Don’t worry if you’re new to the command line – we’ve got you covered with clear examples and explanations.
Step 1: Update Your System
Before we start with the PostgreSQL installation, let’s ensure that your system is up to date. Open a terminal and run the following commands:
sudo apt update
sudo apt upgrade
These commands will update the package lists and upgrade the existing packages on your system.
Step 2: Install PostgreSQL on Ubuntu 23
Now that your system is updated, let’s install PostgreSQL. Ubuntu provides PostgreSQL packages in its default repositories, making the installation process straightforward. Run the following command:
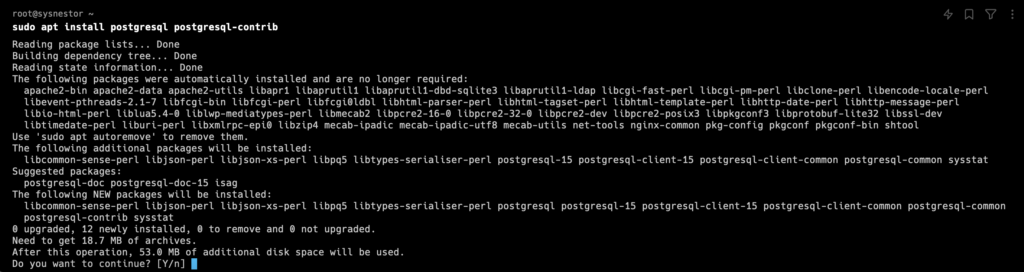
This command installs the PostgreSQL server and additional contributed modules.
Step 3: Start and Enable PostgreSQL Service
Once the installation is complete, the PostgreSQL service should start automatically. In case it doesn’t, you can start and enable it using the following commands:
sudo systemctl start postgresql
sudo systemctl enable postgresql
Step 4: Access PostgreSQL
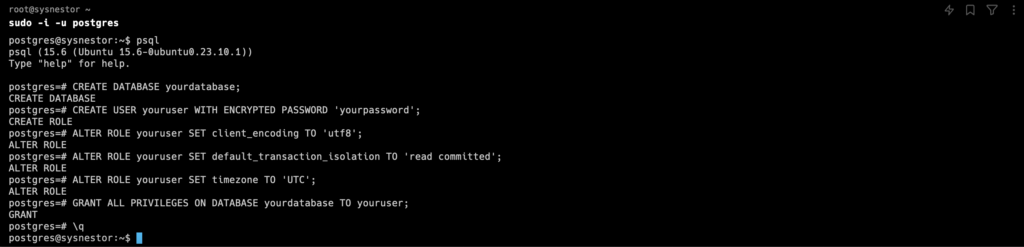
By default, PostgreSQL creates a user named ‘postgres.’ Let’s switch to this user and access the PostgreSQL prompt:
sudo -i -u postgres
psql
You are now in the PostgreSQL interactive terminal.
Step 5: Create a Database and User
Let’s create a new database and user for your application. Replace yourdatabase and youruser with your desired names:
CREATE DATABASE yourdatabase;
CREATE USER youruser WITH ENCRYPTED PASSWORD 'yourpassword';
ALTER ROLE youruser SET client_encoding TO 'utf8';
ALTER ROLE youruser SET default_transaction_isolation TO 'read committed';
ALTER ROLE youruser SET timezone TO 'UTC';
GRANT ALL PRIVILEGES ON DATABASE yourdatabase TO youruser;
GRANT ALL PRIVILEGES ON SCHEMA public TO youruser;
Exit the PostgreSQL prompt using \q.
Step 6: Test the Setup
Open the PostgreSQL configuration file using a text editor. In this example, we’ll use nano:
nano /etc/postgresql/15/main/pg_hba.confLocate the section that looks like:
# "local" is for Unix domain socket connections only
local   all             all                                     peer
Change peer to md5:
# "local" is for Unix domain socket connections only
local   all             all                                     md5
Save the changes and exit the text editor. Now, restart PostgreSQL to apply the changes:
sudo systemctl restart postgresqlTo ensure everything is set up correctly, let’s log in with the new user and check if you can create a table:
psql -U youruser -d yourdatabase
Congratulations! You’ve successfully installed and configured PostgreSQL on your Ubuntu 23 system. You’re now ready to build powerful and scalable database-driven applications.
Remember to customize the database and user names, passwords, and other details according to your specific requirements. Happy coding!