Do your WordPress Updates not appear as expected? Users of WordPress frequently have this problem. Problems with caching, whether in your own web browser, the cache of your WordPress website, or the cache of your content delivery network, nearly always cause issues (CDN).
How Long Does It Take for the WordPress Updates?
In general, your WordPress site needs to update right away when you press the save button. That is, after pressing the save button, you should be able to access the corresponding page and see the changes right away.
Why Is My WordPress Updates Don’t Work?
You might not be able to view updates on your WordPress site because of many forms of caching:
- CDN caching
- Page caching
- Browser caching
How to Fix CDN Caching
Another explanation for why your WordPress Updates aren’t showing up is that you may be employing a content delivery network (CDN) to speed up global load times.
A CDN functions by caching the static content of your website on its global network of servers. Then, it provides those files to each visitor from the place that is closest to them.
However, if your CDN has cached an outdated copy of a CSS stylesheet or image file, it might cause a problem with WordPress updates not appearing. This is uncommon to occur with your actual content, but it can be a regular issue with static items, such as photos and scripts, that you might put on the CDN.
You may resolve this, like the other caching issues, by deleting the cache at your CDN. Depending on your CDN, the specific methods to complete this will vary. If you are using Cloudflare you should purge cache:
- Log in to your Cloudflare dashboard.
- Click Caching > Configuration.
- Under Purge Cache, click Custom Purge. The Custom Purge window appears.
- Under Purge by, select URL.
- Enter the appropriate value(s) in the text field using the format shown in the example.
- Perform any additional instructions to complete the form.
- Review your entries.
- Click Purge.
How to Fix Page Caching
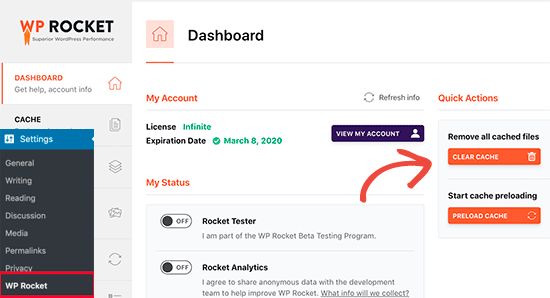
For example, if WP Rocket is installed on your website, all you need to do is visit the Settings » WP Rocket page and select the “Clear Cache” option under the dashboard tab.

How to Fix Browser caching
Certain website assets are saved in your computer’s browser cache in order for browser caching to operate. It saves you from having to continuously download these files from the server of your WordPress website. You can resolve the issue by instructing your browser to download all files from your server in their most recent iterations rather than retrieving them from the cache.
Your browser will skip the cache and retrieve all web server files when you perform a hard refresh.
Start by opening a tab that contains the page of your website where you anticipate modifications. then press the following keystrokes on the keyboard:
Cmd + R on Mac
CTRL + F5 on Windows
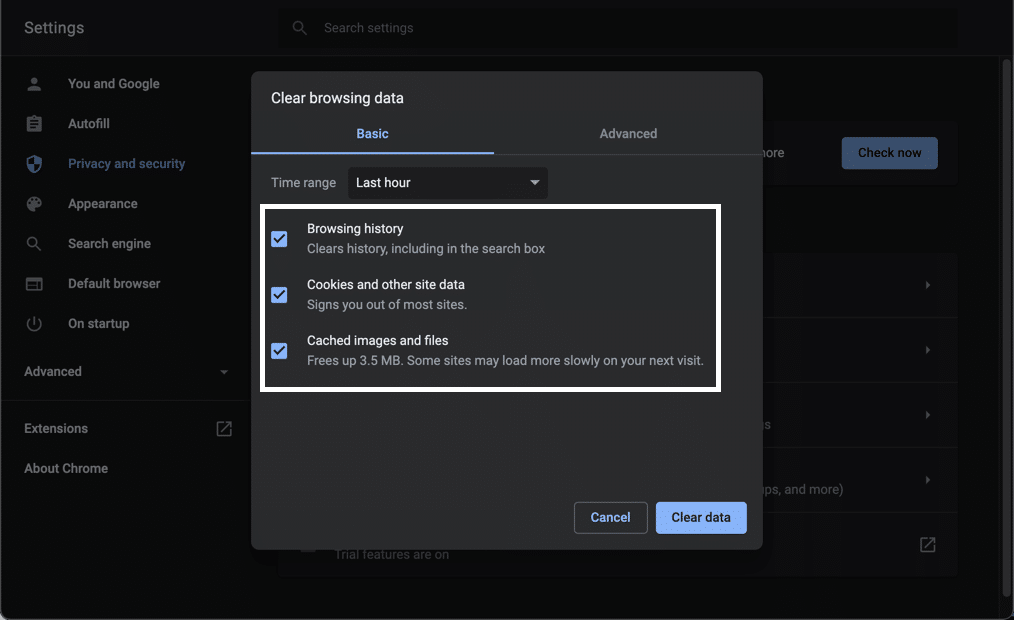
If the hard refresh wasn’t successful and your WordPress Updates do not appear, you might need to completely delete the cache in your browser. This will remove all cached files and force you to download fresh copies of all the files on your site.
To clear the cache for Google Chrome, start by clicking the Three Dots icon in the top right of your browser window. Then, navigate to the More Tools option and select Clear browsing data… from the submenu:

