If you’re a WordPress user, you may have experienced issues with the overwriting .htaccess file. The .htaccess file is an important file that controls how your website functions, and if it’s overwritten, it can cause all sorts of problems. In this tutorial, we’ll show you how to stop WordPress from overwriting your .htaccess file.
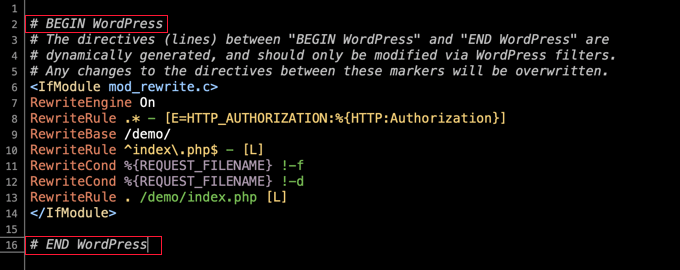
Before we get started, let’s first understand what the .htaccess file is and what it does. The .htaccess file is a configuration file that’s used by the Apache webserver to control how your website functions. It’s located in the root directory of your website and is used to control things like URL redirects, caching, and security settings. WordPress uses the .htaccess file to create pretty permalinks, which are more user-friendly URLs that are easier to read and remember.
Now, let’s dive into the tutorial.
Step 1: Make a backup of your .htaccess file
Before you make any changes to your .htaccess file, it’s important to make a backup. This will ensure that you can revert back to the original file if anything goes wrong.
To make a backup of your .htaccess file, simply download a copy of it to your computer. You can do this by logging into your website’s FTP server and navigating to the root directory. From there, look for the .htaccess file and download it to your computer.
Step 2: Disable WordPress from overwriting .htaccess file
The first step to stopping WordPress from overwriting your .htaccess file is to disable the feature that allows it to write to the file. To do this, you’ll need to add a line of code to your wp-config.php file.
Open your wp-config.php file in a text editor and add the following line of code:
define( 'WP_USE_THEMES', false );This code will disable WordPress from writing to your .htaccess file. Save the file and upload it to your website’s root directory.
Step 3: Update your .htaccess file manually
With WordPress no longer able to write to your .htaccess file, you’ll need to update it manually. To do this, simply open the backup copy of your .htaccess file that you created in step 1 and make any necessary changes.
For example, if you want to add URL redirects to your website, you can do so by adding the following code to your .htaccess file:

This code will redirect any requests for the old URL to the new URL.
Once you’ve made all of the necessary changes to your .htaccess file, save the file and upload it to your website’s root directory.
Step 4: Protect your .htaccess file
Now that you’ve updated your .htaccess file manually, it’s important to protect it from being overwritten in the future. To do this, you can change the permissions on the file so that it’s read-only.
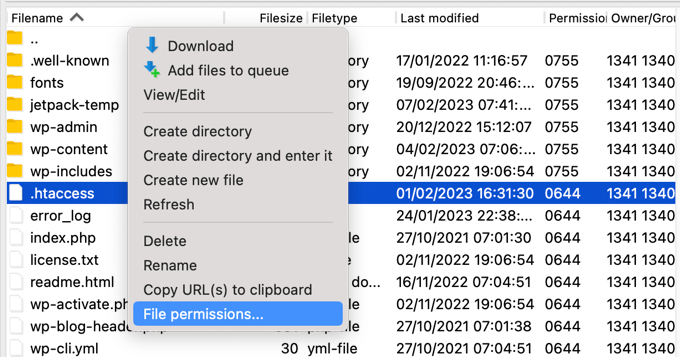
To change the permissions on your .htaccess file, log into your website’s FTP server and navigate to the root directory. Right-click on the .htaccess file and select “File Permissions” (or something similar, depending on your FTP client).

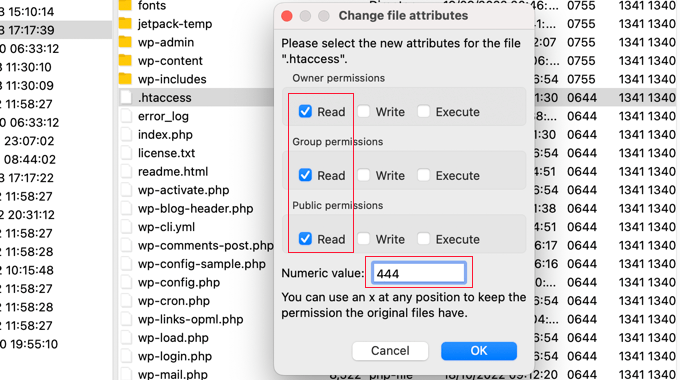
In the file permissions dialog box, look for the “Numeric Value” field and enter “444”. This will set the permissions on the file so that it’s read-only.

Click “OK” to save the changes and exit the dialog box.
Final Thoughts
In this tutorial, we’ve shown you how to stop WordPress from overwriting your .htaccess file. The .htaccess file is a crucial component of your website’s functionality and security, and it’s important to prevent WordPress from overwriting it. By following the steps outlined in this tutorial, you can disable WordPress from writing to the file, update it manually, and protect it from being overwritten in the future. By doing so, you can ensure that your website remains functional and secure, with all the necessary configurations and settings intact. Remember to always make a backup of your .htaccess file before making any changes and proceed with caution. With these tips in mind, you can effectively manage your website’s .htaccess file and enjoy a smooth online experience.
