
Owning and managing a website can be a complex and multifaceted endeavor, with a myriad of tasks and responsibilities to consider. One of the critical tools in any website owner’s arsenal should be a thorough understanding and mastery of the Zone Manager feature within the cPanel interface. The Zone Manager plays a crucial role in facilitating seamless domain management, ensuring that your website’s domain is properly configured to connect with the internet.
In this tutorial, we will take a deep dive into the intricacies of the Zone Manager, guiding you step-by-step on how to adeptly navigate this feature to add various DNS records, such as CNAME, A, AAAA, MX, and more. By the end of this guide, you will be equipped with the necessary knowledge and skills to confidently manage your domain’s DNS records, ultimately ensuring that your website is primed for optimal performance and accessibility on the world wide web.
What you need
A reliable hosting account that provides cPanel access is essential. This user-friendly, web-based control panel will significantly streamline the management of your website’s technical aspects. Following that, you must have a valid and active domain name, specifically one that you intend to use as the base for managing your DNS records. Your domain name serves as your unique identifier on the web, which is crucial. Last but not least, a solid foundational understanding of DNS records is necessary, along with a clear grasp of the specific functions and roles each DNS record plays in ensuring your website is easily accessible online. This knowledge is pivotal in efficiently managing and troubleshooting any DNS-related issues, ensuring a seamless online experience for both you and your visitors.
Accessing the Zone Manager in cPanel
Let’s dive right in and begin the process of accessing the Zone Manager within your cPanel account. Here’s a step-by-step guide on how to do just that:
- Start by logging into your cPanel account, utilizing your unique username and password.
- As you find yourself on the cPanel dashboard, take a moment to scroll down until you come across the “Zone Manager” section
- Once you’ve spotted it, go ahead and give it a click.
By following these steps, you will be seamlessly directed to the Zone Manager interface. Here, you’ll have the luxury of accessing and managing all the domains that are associated with your cPanel account. Now that we’ve covered the basics of accessing the Zone Manager, let’s move on to the next steps in managing your DNS records.
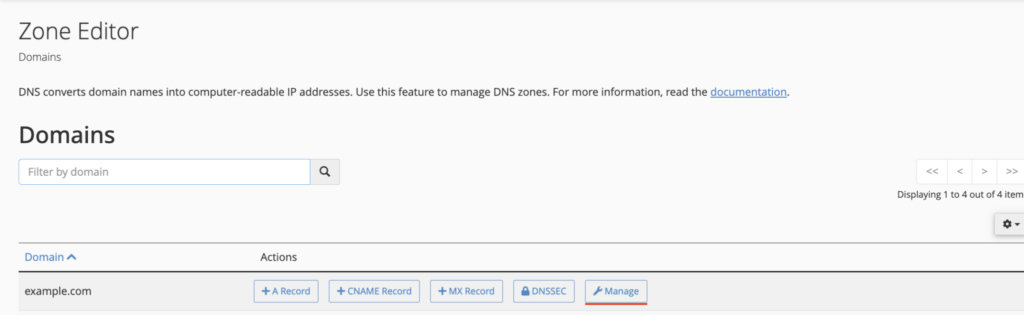
Selecting Your Domain
Upon successfully navigating to the Zone Manager:
You will find yourself faced with an organized list, meticulously displaying all the domains that are intricately linked to your cPanel account.
Take a moment to peruse this list, and when you’re ready, go ahead and meticulously select the specific domain for which you have the intention to add or manage DNS records. This is a crucial step as it ensures that any changes or additions you make will directly affect the chosen domain, optimizing its functionality and performance on the web.
Adding an A Record
The ‘A’ Record, or Address Record as it is sometimes referred to, plays a pivotal role in directing your domain or subdomain to its corresponding IP address, effectively bridging the gap between your domain name and the physical location of your website on the internet. If you’re looking to add an A Record, here’s a simple step-by-step guide to help you navigate through the process with ease:
- Once you’ve successfully logged in and found yourself in the Zone Manager, take a moment to locate the “A Record” option. With a gentle click, you’ll initiate the process of adding a new A Record.
- As you proceed to the next step, you’ll notice a field labeled “Name.” Here, you have the option to input the specific subdomain that you’re aiming to point. However, should your intention be to direct the main domain itself, feel free to leave this field blank.
- Moving on, you’ll find another field labeled “Address.” In this field, you’re required to enter the IP address to which you wish for your domain or subdomain to resolve. This is a crucial step as it ensures that your website is correctly linked to its virtual location on the internet.
- Having completed the above steps and ensured that all the information entered is accurate and as per your requirements, you can now proceed to click on the “Add Record” button. This action will effectively save your newly created A Record, completing the process and bringing you one step closer to a successfully functioning website.
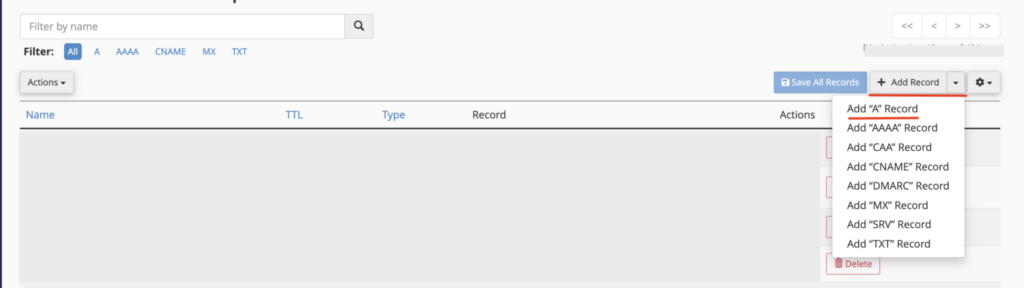
Adding a CNAME Record
CNAME Records, or Canonical Name Records, serve an important function in the realm of DNS management. They allow you to create aliases that essentially act as pointers, directing traffic from one domain name to another. Here’s a detailed step-by-step guide to help you seamlessly add a CNAME Record:
- Begin by navigating to the Zone Manager, a central hub where all the DNS management magic happens. Once there, look out for the “CNAME Record” option and click on it. This action will initiate the process of adding a new CNAME Record.
- Now, you should see a field labeled “Name.” In this field, your task is to input the subdomain that you intend to use as an alias. Be sure to double-check your spelling and entry to ensure accuracy.
- After that, you’ll need to move on to the “CNAME” field. This is where you’ll input the target domain, essentially the destination to which your previously chosen subdomain will be directed or redirected.
- Once you’ve filled in the necessary information, you’re almost at the finish line. The only thing left to do now is to click on the “Add Record” button. This will save your newly created CNAME Record, completing the process and leaving you with a well-configured and functioning alias that points to your target domain, thereby enhancing your website’s accessibility and efficiency.
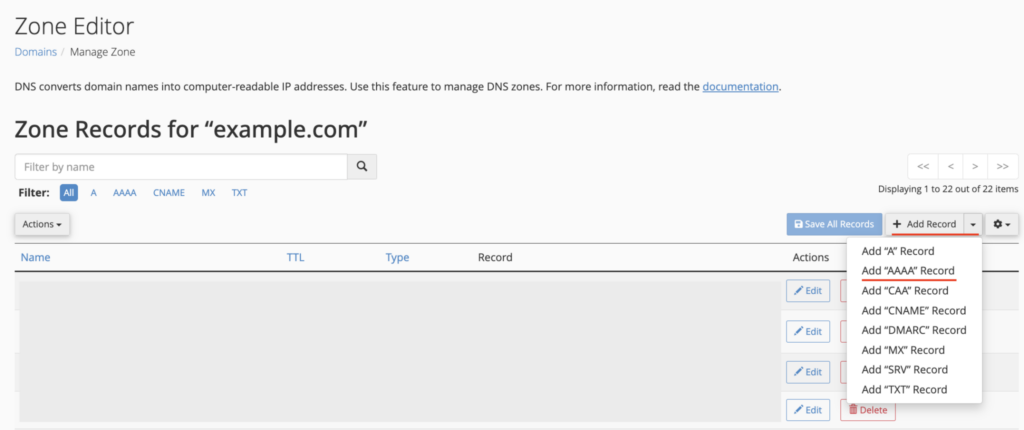
Adding an AAAA Record
AAAA Records are analogous to A Records, with the primary distinction being that AAAA Records are utilized to map a domain or subdomain to an IPv6 address, the latest version of Internet Protocol addresses. The process of adding an AAAA Record is straightforward and can be accomplished with the following steps:
- Begin by navigating to the Zone Manager, which is your command center for all DNS-related activities. Once there, seek out the “AAAA Record” option and click on it, thus initiating the procedure of adding a new AAAA Record.
- Next, you will come across the “Name” field. In this field, you have the option to input the specific subdomain that you are aiming to direct. Alternatively, if your intention is to guide the main domain itself, simply leave this field blank.
- Your next step involves the “Address” field. This is where you must enter the IPv6 address to which you wish your domain or subdomain to ultimately resolve. This step is crucial as it establishes the connection between your domain name and its virtual location on the Internet.
- With all the requisite information now duly entered and reviewed for accuracy, your final step is to click on the “Add Record” button. This action will effectively save your newly created AAAA Record, thereby completing the process and ensuring that your website is now correctly linked to its IPv6 address, ready to be accessed in the online world.
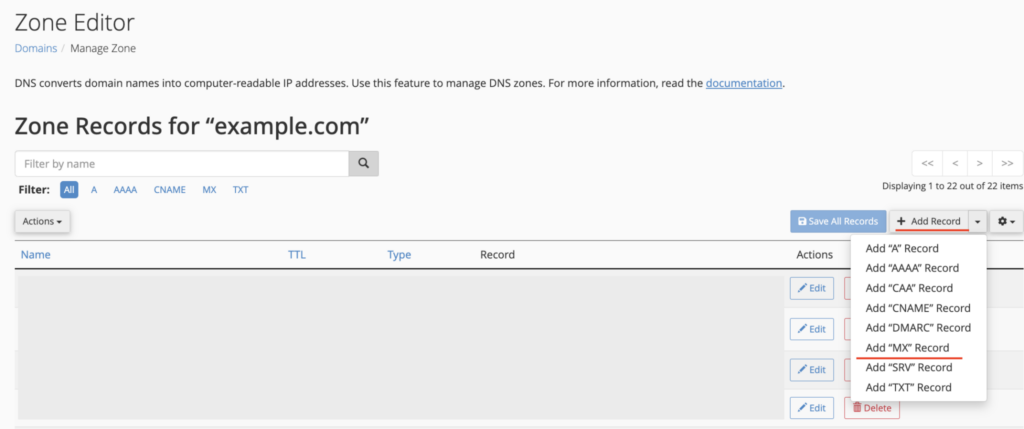
Adding an MX Record
MX Records, or Mail Exchange Records, are essential components of your domain’s DNS settings, playing a pivotal role in ensuring that emails sent to your domain are correctly routed to the designated mail server, with the sender’s priority taken into consideration. The process of adding an MX Record is a simple and straightforward one, and here’s how you can do it:
- To start off, open the Zone Manager, which is the centralized hub for all your DNS management needs. Once you’re there, look out for the “MX Record” option and give it a click. This will set you on the path to adding a new MX Record.
- Your next step involves the “Priority” field. Here, you’ll need to input the priority level assigned to your mail server. It’s important to note that the priority system used here is a numerical one, where a lower number actually signifies a higher priority. Therefore, make sure to assign a value that accurately reflects the priority of your mail server.
- After setting the priority, you’ll need to move on to the “Destination” field. This is where you’ll provide the address of your mail server, essentially telling the system where to direct emails sent to your domain.
- Once you’ve completed all the above steps and double-checked to ensure that all the information you’ve entered is accurate and in order, the final step is to click on the “Add Record” button. This will save your newly created MX Record, effectively completing the process and ensuring that your emails are correctly routed to your mail server, based on the sender’s priority.
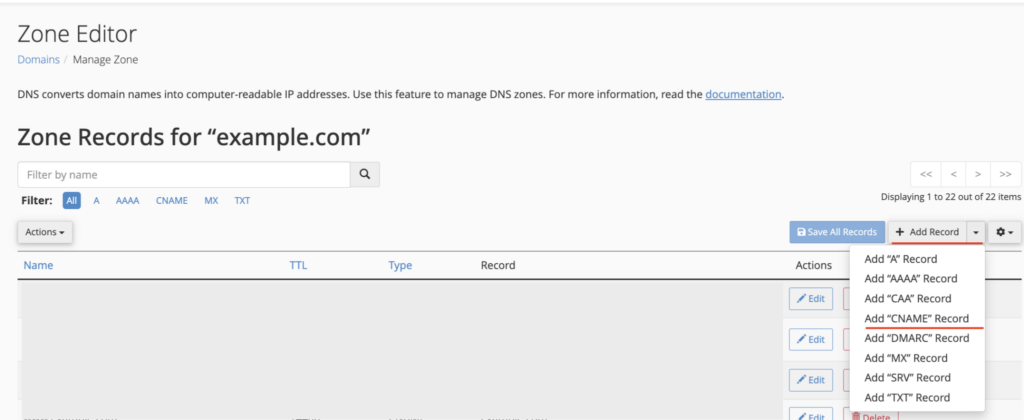
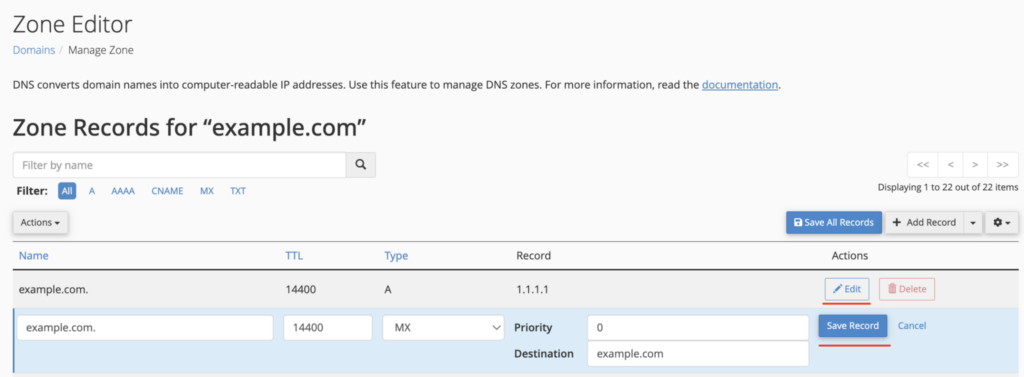
Managing Existing Records
The Zone Manager is a versatile tool that not only facilitates the addition of new records but also provides a comprehensive and user-friendly platform for managing your existing ones. This includes a range of options that allow you to edit and delete records in line with your specific needs and requirements.
Here’s a step-by-step guide on how you can manage your existing records:
- Start by browsing through the comprehensive list of existing records within the Zone Manager. Take your time to carefully locate the specific record that you are looking to manage.
- If your intention is to make modifications to a particular record, look out for the “Edit” button situated adjacent to it. Click on this button to initiate the editing process. This will open up the record and allow you to make the necessary changes as per your needs. Once you are satisfied with the adjustments you’ve made, be sure to click on the “Save Record” button to ensure that your changes are preserved and take effect immediately.
- Conversely, if your objective is to remove a record, the process is even more straightforward. Simply locate the “Delete” button next to the respective record and give it a click. This action will remove the record from your list, effectively decluttering your Zone Manager and ensuring that only the most relevant and necessary records are retained.

Summary
Mastering the management of Zone Manager DNS records is a fundamental aspect of website administration. The Zone Manager within cPanel streamlines this process, providing a user-friendly interface that empowers you to effortlessly add and manage an array of DNS records such as A, CNAME, AAAA, and MX records. By adhering to the detailed steps outlined above, you can confidently ensure that your domain is meticulously configured to align with your precise specifications and requirements in no time at all! Your website will be set up for optimal performance, ensuring a smooth and efficient online presence.