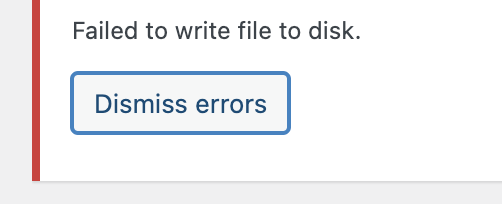
When you’re deep in the flow of updating your WordPress site, there’s nothing more frustrating than hitting an unexpected roadblock. It’s like you’re cruising on the digital highway, and suddenly you get a flat tire. One of the more tiresome hiccups you might encounter is the pesky “Upload: Failed to Write File to Disk” error. It’s an all-too-common issue that can throw a wrench in your content upload process, stopping you dead in your tracks when you try to add new images, themes, plugins, or any files to your beloved site.
But fear not, brave digital pioneer! This hurdle, while annoying, is not insurmountable. In fact, with a bit of guidance and some digital elbow grease, you can get back on track faster than you can say “cache clearing.” This isn’t just another cut-and-dry tutorial; consider this your comprehensive, step-by-step survival guide to not only diagnose but also fix this bothersome issue. By the end of this journey, you’ll have the know-how to tackle the problem head-on and restore order to your WordPress realm. Let’s roll up our sleeves and dive into the troubleshooting deep end, making sure that your site runs as smoothly as a well-oiled machine.
Let’s understand the Failed to Write File to Disk error
Understanding the “Upload: Failed to Write File to Disk” error is like peeling an onion—it has layers. At its core, this Failed to Write File to Disk error is your website’s cry for help, a signal that something’s amiss in the environment where your content lives and breathes. But what exactly causes this digital distress signal? Let’s unpack the layers to set the stage for a troubleshooting odyssey.
First off, think of disk space like the physical rooms in a house. If you run out of space, you can’t bring in new furniture, right? Similarly, if your website is stuffed to the brim with content and there’s no room left on your hosting account, your digital abode simply can’t accommodate any more uploads. That’s when WordPress throws the “no vacancy” sign up in the form of this Failed to Write File to Disk error.
Next, let’s talk about file permissions. These are like the rules of the house set by the landlord—your server. They dictate who can do what within your digital space. If the permissions are too strict, WordPress might not have the right to write new files to the disk, akin to having a house key but not the permission to rearrange the furniture.
Lastly, we have the server configuration issues. This is the foundation your digital house sits on. If the server settings are off-kilter, it can lead to a range of problems, including our infamous Failed to Write File to Disk error. It could be a misconfigured .htaccess file or PHP settings that are not optimized for your site’s operations.
These potential culprits—disk space limitations, incorrect file permissions, and server configuration issues—set the stage for our troubleshooting process. Each one requires a unique approach to diagnose and fix, much like how different home repairs would require a plumber, an electrician, or a carpenter. Understanding these reasons is the first step to getting your site back to its optimal state, allowing you to upload content with ease once again.
Preliminary Checks
Before you roll up your sleeves and prepare for a deep dive into the more technical fixes, there are some initial checks you should perform. These are the low-hanging fruits, the basic first-aid for your website that can sometimes solve the issue without the need for more complex procedures.
First, you’ll want to check the disk space availability on your hosting account. This is akin to checking if your physical storage unit is full before trying to shove in another box. Most hosting providers offer a clear overview of your used and available space in their dashboard. If you find the storage is indeed full, it might be time to either optimize and clear some space or consider upgrading your plan to accommodate your growing site’s needs.
Secondly, ensuring your WordPress site is up to date is like making sure your home appliances are the latest and most efficient models. WordPress frequently updates its software to improve functionality and fix known issues. An outdated WordPress installation might be more prone to errors, so navigate to the Dashboard, then to Updates, and see if there’s a new version waiting for you. Keeping WordPress updated is a good practice not just for performance but also for security.
By starting with these simple checks, you could potentially save yourself a lot of time and avoid unnecessary troubleshooting steps. They are the equivalent of checking if a device is plugged in before trying to diagnose why it won’t turn on—a fundamental first step in any tech troubleshooting process.
Correcting File Permissions
ncorrect file permissions can indeed be the culprit behind the “Upload: Failed to Write File to Disk” error in WordPress. Each file and directory on your WordPress site has a set of permissions that controls who can read, write, and execute said files. Here’s how you can correct these permissions:
Step-by-Step Guide to Correct File Permissions via FTP:
- Access Your Site via FTP Client:
- Download and install an FTP client like FileZilla.
- Connect to your website using the FTP credentials which you can obtain from your hosting provider.
- Navigate to the Root Directory:
- Once connected, navigate to the root directory of your WordPress site. This is usually named
public_htmlorwww.
- Once connected, navigate to the root directory of your WordPress site. This is usually named
- Locate the “wp-content” Folder:
- Find the
wp-contentfolder, which contains your themes, plugins, and uploads.
- Find the
- Check Permissions:
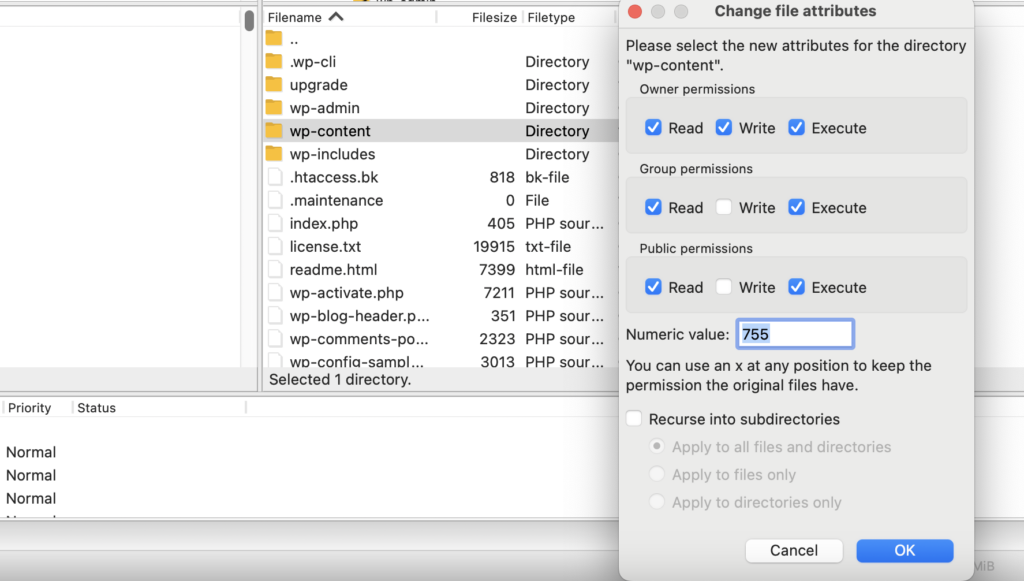
- Right-click on the
wp-contentfolder and select ‘File permissions…’ A dialog box will appear showing the current permissions.
- Right-click on the
- Correct Permissions:
- Folders should have a permission setting of 755, and files should be set to 644. This allows your web server to write to these files while keeping them secure.
- To change the permissions, enter ‘755’ in the numeric value box, check ‘Recurse into subdirectories’, and select ‘Apply to directories only’. Click ‘OK’ to apply these settings.
- Repeat the process for files, but this time enter ‘644’, check ‘Recurse into subdirectories’, and select ‘Apply to files only’.
- Apply the Changes:
- The FTP client will start applying the permissions to the folders and files. This may take a few minutes.
- Test the Site:
- After the permissions have been updated, try uploading a file to your WordPress site again to see if the issue is resolved.
Correcting Permissions via Hosting Control Panel:
- Log into Your Hosting Control Panel:
- Access your hosting account and go to the control panel. Look for a File Manager tool.
- Open File Manager:
- Within the control panel, open the File Manager application.
- Navigate to the “wp-content” Folder:
- Similar to the FTP method, locate the
wp-contentfolder.
- Similar to the FTP method, locate the
- Select and Change Permissions:
- Select the folder, look for a ‘Change Permissions’ or ‘Properties’ option (this may vary based on your hosting provider).
- Set the permissions to 755 for directories and 644 for files. Some control panels allow you to change permissions recursively, meaning it would apply to all subdirectories and files within.
- Save the Changes:
- Save the changes and close the dialog.
- Test the Site:
- Try to upload a file again through your WordPress dashboard.
Incorrect file permissions are not set intentionally most of the time; they can occur during the manual installation of WordPress, a server Failed to Write File to Disk error, or a security breach. Regularly checking and correcting file permissions can save you from many headaches and is a good practice for website maintenance. If you’re not comfortable making these changes yourself, it’s wise to contact your hosting provider or a professional web developer to assist you.
Increasing Disk Space
If you’re dealing with the “Upload: Failed to Write File to Disk” error and you’ve pinpointed disk space as the issue, then it’s time to free up some room or expand your storage. Let’s break down the steps on how to declutter and optimize your space or, if needed, upgrade your plan.
- Cleaning Up the Media Library:
- Access the Media Library: Go to your WordPress dashboard, and click on ‘Media’. You’ll see a list of all the files you’ve uploaded.
- Delete Unused Media: Browse through your media files and delete anything that’s not being used on your site. Be cautious and ensure that you do not delete images or files that are currently in use.
- Bulk Delete: If you have multiple unused files, you can bulk-select them and delete them all at once to save time.
- Optimizing Databases:
- Backup Your Database: Before making any changes, back up your database. You can use a plugin or do this through your hosting control panel.
- Optimize Tables: Use a plugin like WP-Optimize, which can clean up your database by removing post revisions, drafts, and other orphaned data that’s no longer necessary.
- Manual Optimization: If you’re more technically inclined, you can use phpMyAdmin in your hosting control panel to manually optimize your database tables. Select your WordPress database, check the tables you want to optimize, and select the ‘Optimize table’ option.
- Upgrading Hosting Plan:
- Assess Your Needs: Take a look at your current usage and growth trends. How quickly are you running out of space? This will help you determine how much additional space you might need.
- Contact Your Host: Reach out to your hosting provider’s customer service and inquire about your options for upgrading. They can provide guidance on which plan might suit your needs based on your current and projected usage.
- Choose a Plan: Select a hosting plan that not only fits your current size requirements but also accommodates your site’s growth.
- Migration: If the upgrade requires migrating your site to a new server, your host may assist with this process to ensure a smooth transition.
Before you consider upgrading, it’s important to do a thorough cleanup and optimization to make sure you’re using your current resources efficiently. However, if your website is growing and the traffic is increasing, an upgrade might not only solve your space issues but also improve performance and loading times for your visitors. Always remember, a well-maintained and optimally running website provides a better experience for your users and is worth the investment in the long run.
Preventing Failed to Write File to Disk
Preventing the “Upload: Failed to Write File to Disk” error from recurring is all about embracing regular maintenance and monitoring habits. Here are some best practices to keep your WordPress site running smoothly:
- Regular Backups:
- Schedule regular backups of your website. This ensures that you have a recent version of your site saved, which can be a lifesaver in many situations, not just when facing disk space issues.
- Monitor Disk Usage:
- Keep an eye on your hosting dashboard for disk space usage statistics. Some hosting providers offer alerts when you’re nearing your limit, so make sure those notifications are turned on.
- Regularly Clean Your Media Library:
- Periodically go through your media files and delete any that are no longer needed. Consider using a media management plugin that can help identify and manage unused media.
- Optimize Images Before Uploading:
- Use image optimization tools to reduce file size before uploading them to your WordPress site. This not only saves space but also contributes to faster site loading times.
- Maintain Your Database:
- Regularly optimize your database to keep it running efficiently. Get rid of the overhead by deleting old revisions, spam comments, and transient options.
- Use a Content Delivery Network (CDN):
- A CDN can offload static resources like images, JS, and CSS files. This not only reduces the disk space usage on your hosting server but also speeds up the delivery of content to your users.
- Regular Updates:
- Keep WordPress, along with your themes and plugins, up to date. Updates often include optimizations that can improve how your site manages resources.
- Audit Your Plugins and Themes:
- Only keep plugins and themes that you are actively using. Inactive plugins and themes can still take up space and potentially create security vulnerabilities.
- Choose a Scalable Hosting Plan:
- When selecting a hosting provider, choose one that offers scalable plans so that you can easily increase your resources as your site grows.
- Implement Version Control:
- If your website is part of a business or has multiple contributors, consider using version control systems to manage changes and avoid unnecessary duplication of content.
- Educate Your Team:
- If you’re not the only one managing the website, educate your team about the importance of optimizing content and how to check for disk space.
- Use Server Monitoring Tools:
- There are tools available that can monitor your server’s health and send you alerts if there are any issues, including disk space shortages.
By following these practices, you’re not just preventing the “Failed to Write File to Disk” error; you’re also paving the way for a more secure, efficient, and user-friendly website. Regular maintenance is the key to a healthy website and will save you time and energy in the long run.