
In today’s tutorial, we will learn how to deploy TensorFlow on Docker using Ubuntu 24.04. This guide is designed for beginners and will walk you through each step, from setting up Docker to running a TensorFlow container. By the end of this tutorial, you will have a working TensorFlow environment that is easy to manage and replicate.
1. Introduction to Docker
Docker is a platform that allows you to automate the deployment, scaling, and management of applications using containerization. Containers are lightweight, portable, and ensure that applications run consistently across different environments. For data scientists and machine learning enthusiasts, Docker simplifies the process of setting up complex environments like TensorFlow, making it easier to share and collaborate.
Installing Docker on Ubuntu 24.04
Step 1: Update Your System
Before installing Docker, ensure your system is up to date. Open a terminal and run:
sudo apt update && sudo apt upgrade
Step 2: Install Docker
Ubuntu 24.04 provides Docker in its official repositories. To install Docker, run the following commands:
sudo apt install docker.io
Step 3: Start and Enable Docker
After installation, start the Docker service and enable it to start on boot:
sudo systemctl start docker
sudo systemctl enable docker
Step 4: Verify Docker Installation
To verify that Docker is installed correctly, run:
docker --version
You should see an output like Docker version 24.0.x, build xxxxx.
Step 5: Add User to Docker Group
To run Docker commands without sudo, add your user to the Docker group:
sudo usermod -aG docker $USERLog out and log back in for the changes to take effect.
3. Setting Up a TensorFlow Docker Container
Step 1: Pull the TensorFlow Docker Image
Docker Hub hosts official TensorFlow images. To pull the latest TensorFlow image, use:
docker pull tensorflow/tensorflow:latest
This command will download the latest TensorFlow image, which includes TensorFlow, Python, and other dependencies.
Step 2: Run the TensorFlow Container
To start a TensorFlow container, use the following command:
docker run -it --name tensorflow_container tensorflow/tensorflow:latest bash
This command will start a container named tensorflow_container and open a bash shell inside it.
Step 3: Verify TensorFlow Installation
Once inside the container, verify the TensorFlow installation by running Python and importing TensorFlow:
python3
import tensorflow as tf
print(tf.__version__)
You should see the TensorFlow version number printed, confirming the installation.
4. Running and Managing TensorFlow Containers
Step 1: Running Jupyter Notebook
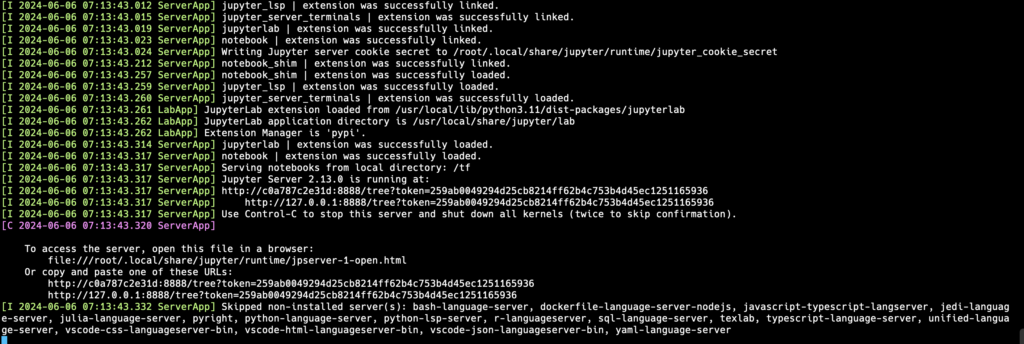
The TensorFlow Docker image comes with Jupyter Notebook installed. To run Jupyter Notebook inside the container, use the following command:
docker run -it -p 8888:8888 tensorflow/tensorflow:latest-jupyter
This command will start a TensorFlow container with Jupyter Notebook running and accessible at http://localhost:8888 on your host machine.
Step 2: Stopping and Restarting Containers
To stop a running container, use the docker stop command followed by the container name or ID:
docker stop tensorflow_container
docker start tensorflow_container
Step 3: Removing Containers
If you no longer need a container, you can remove it using the docker rm command:
docker rm tensorflow_containerDeploying TensorFlow on Docker using Ubuntu 24.04 is a straightforward process that offers many benefits, including environment consistency and ease of sharing. Docker allows you to set up a TensorFlow environment quickly and efficiently, making it an excellent tool for both development and production.
In this tutorial, we covered the basics of Docker, how to install Docker on Ubuntu 24.04, and how to set up and manage TensorFlow containers. With this knowledge, you can now explore more advanced Docker features and customize your TensorFlow environment to suit your specific needs.
Happy coding! If you have any questions or run into any issues, feel free to leave a comment below.
