This tutorial will show you how to use LearnPress to build a strong eCommerce course website. Over the past few years, the digital world has expanded rapidly. There is a rising demand for online courses, regardless of whether you work as a teacher, coach, or businessperson. However, developing an e-commerce platform for courses can be challenging. Here’s LearnPress, a flexible WordPress plugin that can turn your website into a force in online course sales.
While LearnPress has garnered applause for its simplicity and feature-packed offering, LearnPress Pro takes everything a notch higher. With the Pro version, the creators at ThimPress have addressed several user requests, refining the LMS experience and making it more holistic.
Standout Features of LearnPress Pro
- Enhanced Course Builder: LearnPress Pro boasts a more dynamic course builder. In addition to creating lessons and quizzes, you can now incorporate assignments and interactive content, ensuring richer student engagement.
- Advanced Quizzing: The Pro version amplifies the quizzing experience. Incorporate a mix of question types, set up timed quizzes, and employ randomization to keep things fresh for students.
- Premium Themes & Layouts: One of the standout features of LearnPress Pro is its access to exclusive themes and layouts. Tailored for eLearning, these designs enhance user experience, making content more digestible and engaging.
- Certificates & Badges: Recognition drives motivation. With Pro, designing and issuing certificates becomes a breeze. Plus, with the gamification add-on, rewarding students with badges can boost course completion rates.
- Drip Content: Control the pace of your course by releasing content over time. This ensures students don’t rush through material, leading to better retention and understanding.
- Gradebook & Advanced Reporting: A pivotal feature for educators, the gradebook gives a holistic view of student progress. The advanced reporting refines this further, offering insights into areas of improvement.
- Content Interactivity: With LearnPress Pro, infuse interactivity into your courses. Whether it’s embedding videos, polls, or interactive modules, your courses will be far from monotonous.
- Bundled Plugins: The Pro package comes bundled with a suite of premium plugins tailored for an advanced LMS experience. From co-instructors to student wishlists, the possibilities are expansive.
- Priority Support: One area where Pro shines unequivocally is support. With dedicated round-the-clock assistance, any issues or queries are addressed promptly.
Setting up the eCommerce Course Website
Click here and you will navigate to the official ThimPress website or the marketplace where LearnPress Pro is sold. After purchasing, you’ll receive a download link or file for the LearnPress Pro plugin.
- Navigate to Plugins:
- Once you’re in the dashboard, find the ‘Plugins’ option on the left sidebar and click on ‘Add New’.
- Upload Plugin:
- On the ‘Add Plugins’ page, you’ll see an ‘Upload Plugin’ button at the top. Click on it.
- This will provide an option for you to choose and upload the plugin file.
- Click ‘Choose File’, navigate to the location where you downloaded LearnPress Pro (usually in
.zipformat), and select it.
- Install and Activate:
- After selecting the file, click ‘Install Now’.
- WordPress will now upload and install the plugin for you.
- Once installation is complete, you’ll see an ‘Activate Plugin’ link. Click on it to activate LearnPress Pro.
- Enter License Key:
- After activation, some premium plugins, like LearnPress Pro, might require you to enter a license key to access all its features.
- Go to the LearnPress or ThimPress settings (usually on the left sidebar or under ‘Plugins’) and find the license section.
- Enter the license key provided upon your purchase.
- Configure & Set Up:
- Once activated, you can navigate to the LearnPress settings to configure the plugin as per your preferences.
- If LearnPress Pro comes bundled with additional extensions, repeat the upload, install, and activate steps for each extension.
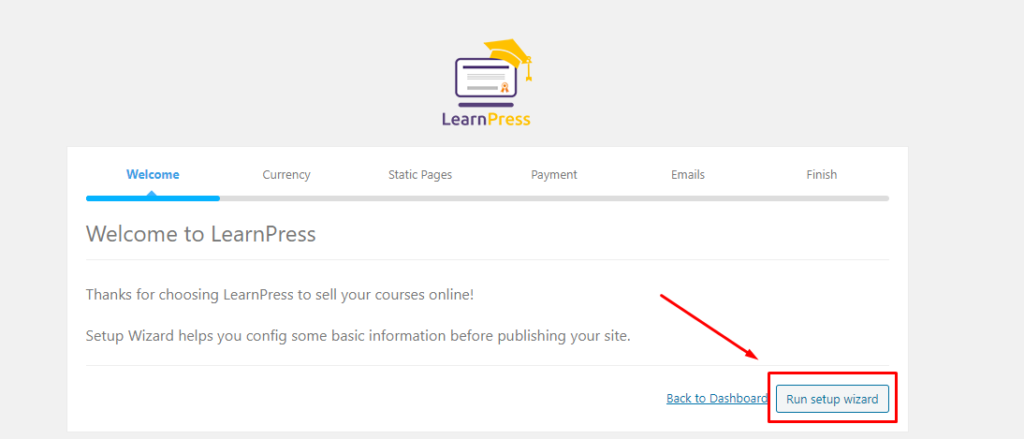
With the plugin activated, a dedicated section emerges on your dashboard. Dive into LearnPress Settings to configure payment options, communication emails, and general settings tailored to your needs.

Then proceed with the setup steps including configuring currency, payment options, etc.
Crafting Your eCommerce Course Masterpiece
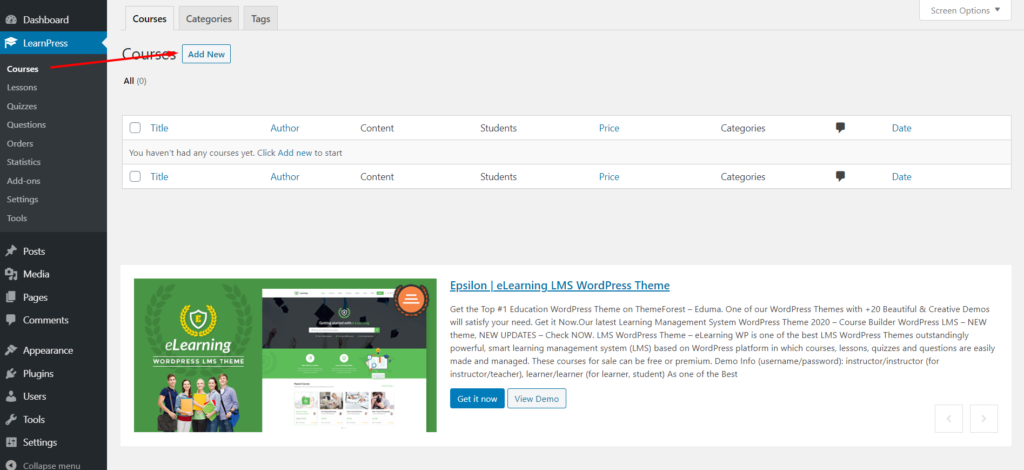
Click on LearnPress > Courses > Add New. Here:
- Give your course a compelling title.
- Write an engaging description. This is paramount for SEO, so ensure it’s rich with keywords without sounding forced.
- Choose a vibrant featured image to captivate potential learners.
- There are many options in the “Course Settings” section for you to configure your course.
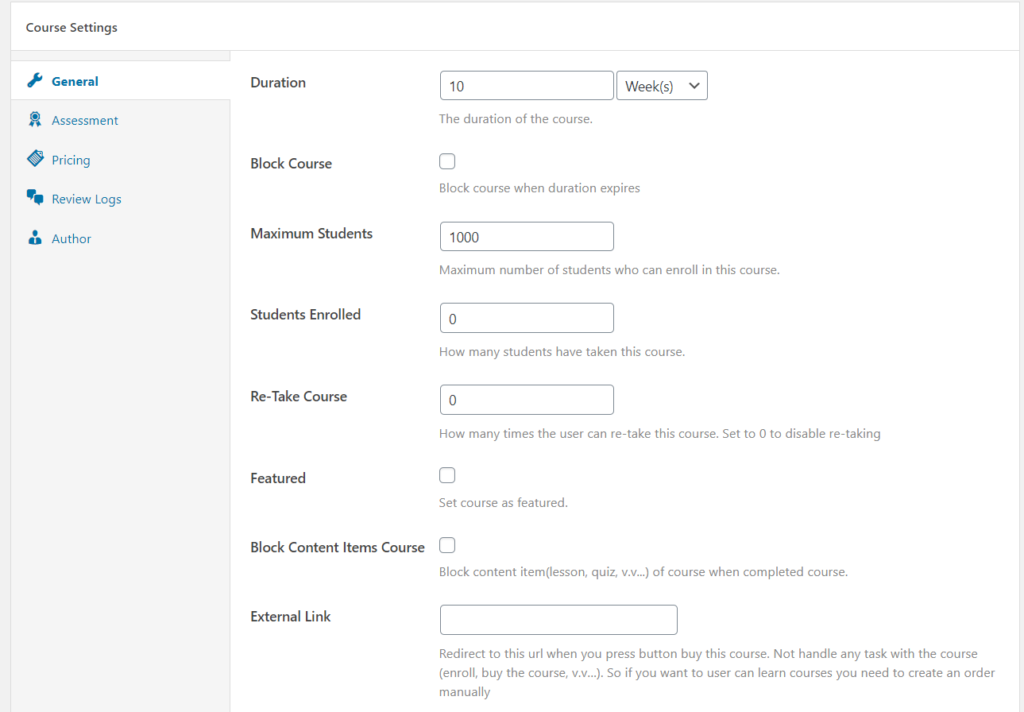
- Duration: The duration of the course. It will start when students sign up for the course.
- Block Course: Block courses after their time period has passed. The course material won’t be available to students any longer.
- Retake Course: The number of times a student may take a course after finishing it.
- Block Content Items Course: After a student completes the course, block the course material.
- External Links: Redirect users to the specified link. Use this if you want to link the course to a different website’s course.
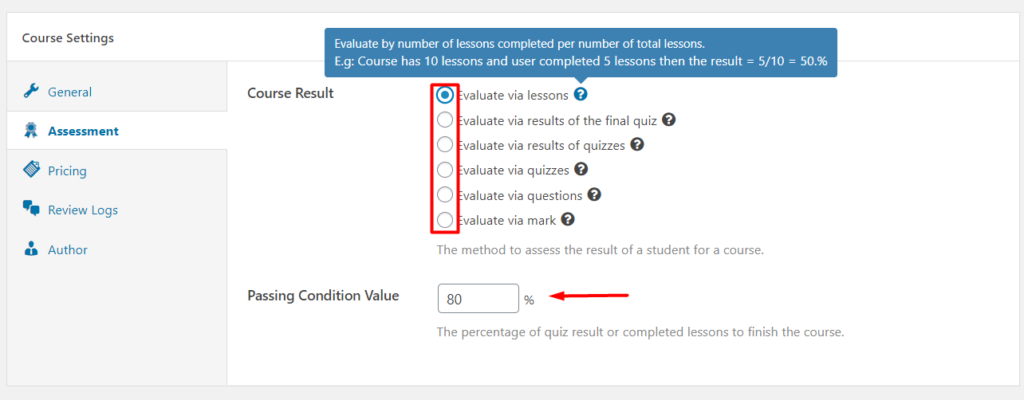
The Assessment tab on a course lets you select the passing standard. There are six standard options for a course. You can view their descriptions and examples by moving your mouse over the question mark.
You can specify the sale price for a course as well as the start and end times for the promotion.
The “No Requirement Enroll” option is only accessible when the price is set to 0. Users can access and learn from a course without logging in or enrolling.

As an administrator, you have the power to substitute a different instructor for the course’s author. If you want to assign more than one instructor to a course, you can use the “Co-instructor add-on for LearnPress” which is available at this link.
Structuring the Curriculum
This page will display all of the course’s sections, lessons, and quizzes.
You can choose the components (lessons, quizzes) you want to include in the course by clicking the “Select items” button. Please be aware that you can only add courses that are not already assigned to other courses. You can create lessons and quizzes in this section; a lesson is represented by a book icon, a quiz by a clock icon, and you can edit an item by clicking “Edit” on the new tab.
Summary
Venturing into the e-learning space with an eCommerce course website is no small feat, but with LearnPress, the process is both streamlined and rewarding. By harnessing its features and pairing them with solid SEO practices, you can establish a lucrative platform that educates, engages, and earns.

Comments (1)