In this article, we’ll look more closely at the possible causes of this issue and examine the various error codes like This Site Can’t Be Reached error. Whenever you run into a problem, you’ll usually want to find a faster solution.
The error This Site Can’t Be Reached often indicates that something is preventing the browser from reaching the target website. Anything from a network configuration error to a network outage to a problem with your DNS settings could be the cause of this.
This issue may, in the worst situation, prevent you from browsing your own website. Testing your WordPress website, adding new content, installing security updates, and making other crucial changes will be challenging as a result.
Step 1 – Check your domain’s nameservers to fix This Site Can’t Be Reached
In the DNS, a nameserver is a server that converts domain names into IP addresses. DNS records, which each connect a domain with one or more IP addresses, are stored and organized by nameservers. These servers serve as a link between IP addresses, which computers can understand, and domain names, which we as humans can remember.
There are different ways to check if your domain is missing the nameserver, but we will show you the fastest way using your Command Prompt for Windows users and Terminal for Mac users.
For Windows users:
- Press Windows + R shortcut command on your keyboard. Type in cmd and press OK.
- You should now see a command prompt window where we will carry out the last few phases of this process.
- Type in the following command:
- nslookup -type=ns yourdomainname.com
- Here we’re using our domain as an example. Similar information will show up:
Non-authoritative answer:
wpvalid.com nameserver = liv.ns.cloudflare.com
wpvalid.com nameserver = zeus.ns.cloudflare.com
For Mac users:
- Open your terminal and type in the following command:
- dig NS yourdomainname.com
- Here we’re using our domain as an example. Similar information will show up:
wpvalid.com. 21600 IN NS liv.ns.cloudflare.com.
wpvalid.com. 21600 IN NS zeus.ns.cloudflare.com.
If your domain doesn’t have any nameservers you will have to set them at your domain registrar.
Step 2 – Change Your Device DNS Server to fix This Site Can’t Be Reached
DNS resembles the phone book of the internet. The DNS lists domain names and their related IP addresses rather than people’s names and contact information.
A DNS server is automatically assigned to you by your internet service provider. But occasionally, this server might not be available or its data might be inaccurate.
You will receive a “This Site Can’t Be Reached” error if your browser doesn’t have the correct address for a certain website.
By using an alternative public DNS server, such as Google Public DNS or Cloudflare, you can resolve this issue. Any public server you choose may be used, but keep in mind that the DNS provider will be able to see every page you visit.
Google Public DNS:
8.8.8.8
8.8.4.4
Cloudflare Public DNS:
1.1.1.1
For Windows users:
DNS settings are specified in the TCP/IP Properties window for the selected network connection.
Example: Changing DNS server settings on Windows 10
- Go to the Control Panel.
- Click Network and Internet > Network and Sharing Center > Change adapter settings.
- Select the connection for which you want to configure Google Public DNS. For example:
- To change the settings for an Ethernet connection, right-click the Ethernet interface and select Properties.
- To change the settings for a wireless connection, right-click the Wi-Fi interface and select Properties.
- If you are prompted for an administrator password or confirmation, type the password or provide confirmation.
- Select the Networking tab. Under This connection uses the following items, select Internet Protocol Version 4 (TCP/IPv4) or Internet Protocol Version 6 (TCP/IPv6) and then click Properties.
- Click Advanced and select the DNS tab. If there are any DNS server IP addresses listed there, write them down for future reference, and remove them from this window.
- Click OK.
- Select Use the following DNS server addresses. If there are any IP addresses listed in the Preferred DNS server or Alternate DNS server, write them down for future reference.
- Replace those addresses with the IP addresses of the Google DNS servers:
- For IPv4: 8.8.8.8 and/or 8.8.4.4.
- For IPv6: 2001:4860:4860::8888 and/or 2001:4860:4860::8844.
- For IPv6-only: you can use Google Public DNS64 instead of the IPv6 addresses in the previous point.
- Test that your setup is working correctly; see Test your new settings.
- Repeat the procedure for additional network connections you want to change.
For Mac users:
To change these preferences on your Mac, choose Apple menu -> System Preferences, click Network, select a network service in the list on the left, click Advanced, then click DNS.
If there’s a lock at the bottom left of the Network pane, click it to unlock the preference pane.
Step 3 – Clear your DNS cache to fix This Site Can’t Be Reached
For Windows users:
- Press Windows + R shortcut command on your keyboard. Type in cmd and press OK.
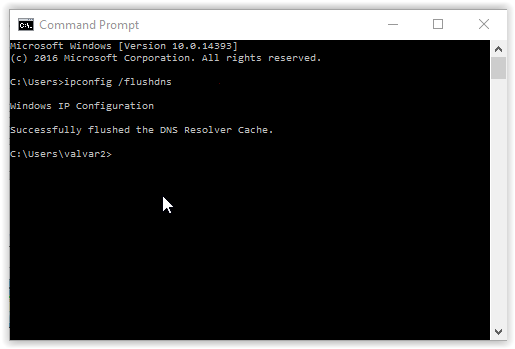
- Type ‘ipconfig /flushdns’ in the Command Prompt, and press Enter.
- The user has now flushed the DNS Cache and will receive a message that they have successfully done so.
- Type ‘exit’ into Command Prompt or select the red X at the top right corner of the window to exit the Command Prompt.

For Mac users:
- Open Up your terminal
- Type in the following command:
- sudo dscacheutil -flushcache

Please let us a reply if this article helped you to Fix WordPress “This Site Can’t Be Reached”
